“L’CHAIM!”- The BHB’s Forays Into Homebrewing, Part 2

Good evening, friends and neighbors!
Picture

on On The Bench… some dude screamed the whole time with his arms up or something.
Actually, I told you how to how to get started brewing a simple mead at home. Here’s what you do for when the 10 days- 2 week fermentation time is up!
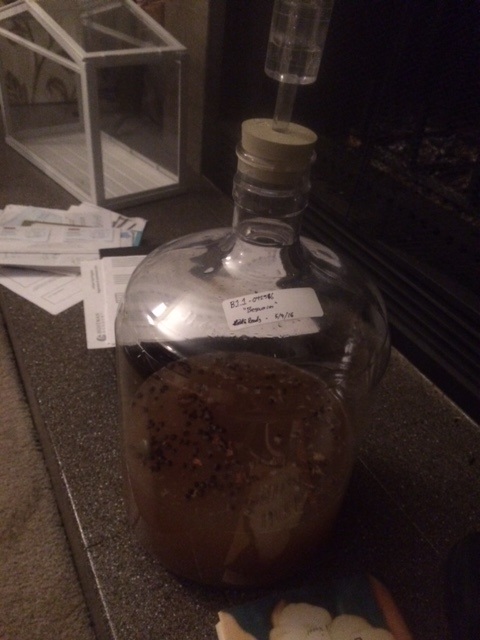
Ok, not to curb your enthusiasm or anything, but just a quick note- this is only the PRIMARY fermentation. Today, we’ll be getting your delicious mead off the dead cells, sediments and whatnot that might mess up the flavor if you let it sit there. Your mead will KEEP fermenting until either it runs out of sugar (which can take years) or you choose to kill it by boiling and filtering it.

Mead is interesting in that, in most cases, after it is bottled it can be cellared INDEFINITELY. You can drink this stuff in 5 years and see where the reaction and aging has taken it. If you just want a sweet, quick little drink, go ahead and enjoy now. Otherwise, hold off for a while- this is only a BABY mead at this point.
Picture

Unless you’re REALLY into drinking babies for some reason…

What To Do When Your Mead is Done

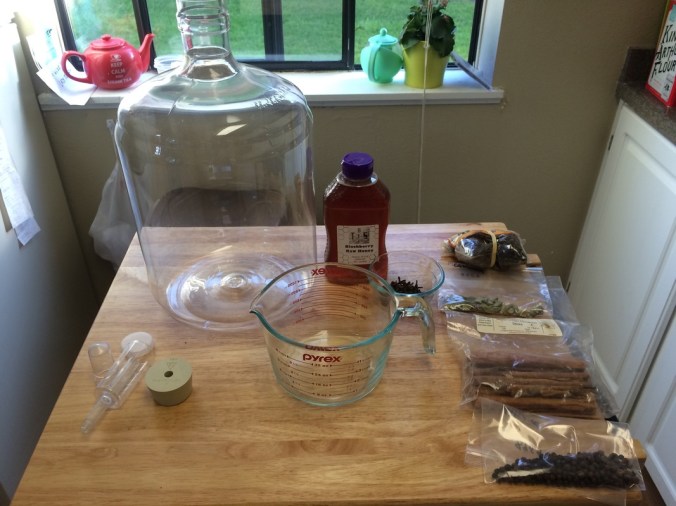
First of all, you might want to get some equipment from your local homebrew supply store:
A large tub for sanitzing everything (remember what I said about cleanliness?). This is a storage tub I got from Home Depot, filled up with about 10 gal. of water.
This is my preferred sanitizing agent, BTF Iodophor- an iodine-based cleaner. It’s food-safe, doesn’t require rinsing afterwards (even though I do anyway,) and doesn’t leave a funky flavor on the stuff it cleans. Whatever you decide to get, pick something that won’t leave weird flavors, and DEFINITELY won’t mess with your equipment.
Just dump the appropriate amount in (following the sanitizer’s instructions) and mix.

You’ll also want a couple of tools to make this process a little easier for you. None of these things will break the bank, and in fact some homebrewing stores may include them in a “starter” kit.

This is an auto-siphon, an open-ended pump that’ll make it super easy to get your mead from your big fermenting jug to smaller bottles. This one even has a special cap on the bottom to keep it from sucking up TOO much of the sediment.
You’ll also need a length of food-safe tubing. I picked up a clamp for mine just to keep things neat.
This is a bottle filler, and it will prevent a LOT of cleanup later, trust me. The valve on the bottom only opens when pressed, so with your siphon and hose connected to this bad boy, your mead will go where you want it- as opposed to the floor.
Bottles. Duh.

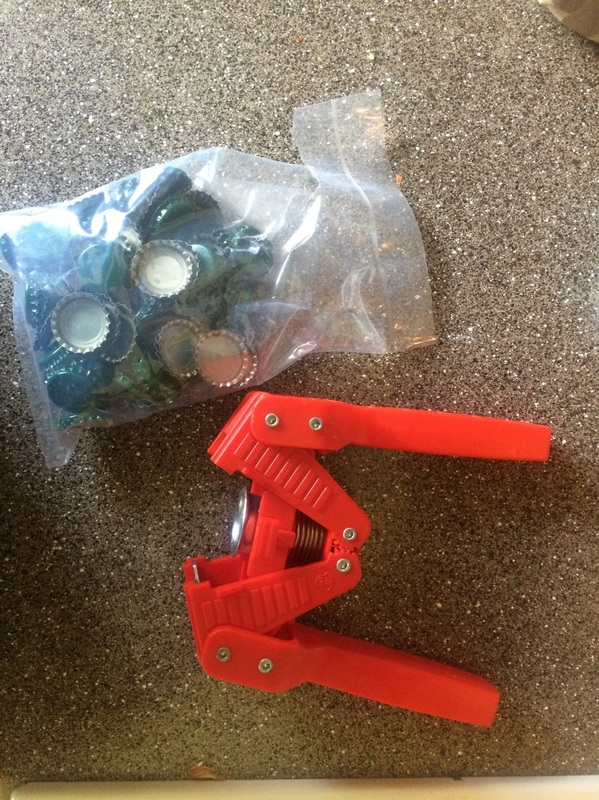
Those are the basics. I also have a hydrometer, testing flask, capper and caps.

These are for if you are a super-nerd like me and really want to figure out the proof (alcohol content) of your mead. The capper and caps are only a must if you want to store it in bottles that don’t have a swing or screw top, and it’s cheaper than a corking machine.

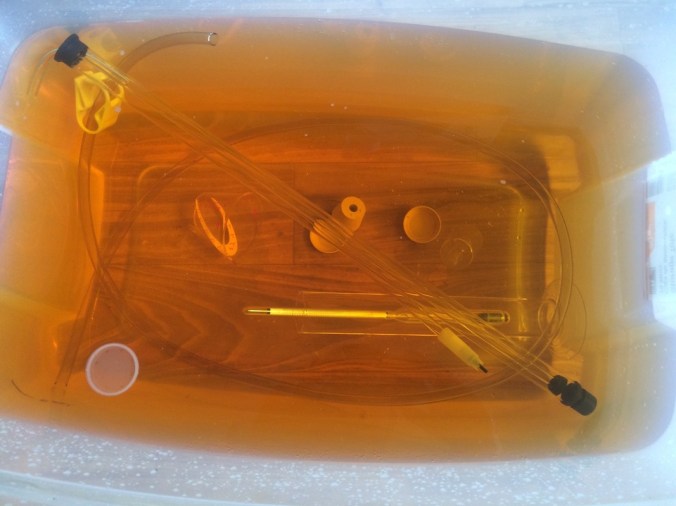
At this point, you will want to chill your mead down as best you can. This will slow down the fermentation and it will gather most of your sediments to the bottom in a process called “clarifying.”

This whole process is called “racking.” In winemaking, this would be when the wine is pumped from steel fermentation containers to barrels so that it can sit and age. In my case, my big 3 gal. fermenter can’t fit in my fridge, so I split it up between several smaller containers so I can clarify it more quickly and fully rack it later.

​CLEAN EVERYTHING!!!

Picture

FIll all your bottles with sanitizing solution, let sit about 4 minutes, then dump them out…
Picture

…drain them well, and let them air/sun dry.
Picture

Everything else goes in the tub for about 5 minutes, immersed COMPLETELY, inside and out.
EVERYTHING that interacts with your mead must be cleaned, sanitized, drained, and air-dried. EVERYTHING.

Once you have your cleaning out of the way, it’s time to set up your siphon and get things going!

Simply take your hose and connect your auto-siphon to one end, and your bottle filler to the other. Drop the business end of your siphon slowly into your mead so that it sits JUST ABOVE the sediment on the bottom. Yes, you will lose some mead to that. Sorry. :C
If you’ve ever filled up a fuel can or cleaned a pool, you know how a siphon works. Put simply, it’s when water goes down a tube in such a way that it pulls more water with it. The pump on your auto-siphon will get your mead “up the hill” enough that it can fall and create the siphoning action. Since the end of your hose has your bottle filler on it, you might need someone to press that down into your first bottle while you pump. That’ll get everything going.

From there… just fill up your bottles!

Cap them in whatever way pleases you. I love swing-top bottles just for this purpose.

Voila! You have bottled your first mead! Now label it, date it, and either drink it or store it!

​Just remember, before you put all your equipment away…

Yeah, you weren’t getting away from that one. Brewing is mostly cleaning.

At least you get booze out of it!

​Stay Classy,

“L’CHAIM!”-The BHB’s Forays into Homebrewing, Part 1

Good evening, friends and neighbors!

Like many good, honest souls across this great land of ours, indeed this whole wonderful world… I like my booze.

Wide and varied is the world of fermented portables, and I am very keen to try as many as I can from as far abroad as I can. Call it my humble task in bringing understanding and goodwill the world over… or I just want to get pickled in the tastiest ways possible. Whichever way is tax-deductible
Picture

Obviously, company is welcome in my quest… provided you cover your own tab time to time.
That said, sometimes my financial situation is not exactly conductive to my altruistic bringing-peace-through-boozing desires. Being a bit of a do-it-yourselfer, though, makes that MUCH less of an obstacle.

With the recent rush toward everything being local, seasonal, homemade, small-batch, etcetera, the long-loved tradition of homebrewing in America has emboldened the “microbrewing” surge, and let humble beer and wine-lovers like myself not only embrace a new set of skills, but make the jump into entrepreneurship- bringing the taste of home and local flavor to the masses.

While most of these ambitious drinkers embrace the complexities of beer or austerity and mystery of wine, I have chosen a more simple, ancient, and no less wonderful beverage to bend my thirsty energies against.

MEAD.

The legendary drink of Vikings, and potentially the oldest fermented drink in history. Thick and sweet or light and refreshing, easy to make, and usually gluten-free.

Mead is little more than a fermentation of honey and water, sometimes with the addition of fruit, juices, spices, herbs, or any other conceivable flavoring. While beer and wine aficionados will argue to the end of time, throwing archaeological proof at each other over whether man fermented grain or grapes first, I make the humble assertion that only honey NATURALLY occurs in a fermentable state. Grapes must be crushed, and grain must be milled and steeped to make mash for beer or whiskey- raw honey only needs water and time. With Paleolithic evidence available for the gathering of honey from wild hives, I maintain that mead has a VERY strong case.

I started brewing my own mead about a year or so ago, after Emily’s family gave me a copy of “The Art of Fermentation” for Chanukah. The book is a veritable encyclopedia for anyone who wishes to understand and control the forces of fermentation, pickling, canning, and pleasurable decomposition. Since then, I have made several brews ranging from the acrid to the pleasurable to the competition-worthy (one of which I have just recently entered into the Oregon Homebrewing Festival.)
Picture

“Scarlet O’Hara”- a mead I made with raw meadowfoam honey, dried hibiscus, and vanilla bean. Tasting is on the 7th- wish me luck!

Obviously, if homebrewing is something you wind up REALLY getting into, there are WAY more sources for you than my little blog, and a lot more details you can play around with. Online, you can get a lot of leads from the American Homebrewers Association. The books on homebrewing are numberless, but recently my go-to guide for how-tos and ideas is Ken Schramm’s “The Compleat Meadmaker.” If you have a homebrew supply store nearby, you can absolutely ask there or even see if they offer classes.

For the purposes of this blog, though, I’m just going to give you a quick how-to on an absolutely basic level spiced mead.

How to Get Hopped Up On Honey

YOU WILL NEED:

  • ​1 lbs. raw honey (available at most health food stores and crunchy supermarkets. If they have a bunch of varietals, pick the one that most appeals!)
  • 4 lbs. water (about 2 quarts. This 4:1 ratio will give you a “standard” strength mead. For a thicker, sweeter, “sack” strength mead, go for a 2:1 ratio.)
  • A combination of your favorite herbs and spices (don’t go overboard here- you want the BEST tasting spices, but not so many that your mead becomes undrinkable. This ESPECIALLY goes for strong ones like whole cloves.)

Equipment:
(All of this should be SANITIZED- you can use whatever means you like- steam, chemical, whatever. Just make sure they are really REALLY clean.)

  • 2 strong glass containers, about 1 gallon each. Fermentation creates carbon dioxide (CO2), and a LOT of it. Exploding containers are no fun, so make sure they are up to the task.
  • Measuring cup
  • Funnel
  • Strainer/sieve
  • Strong-fitting caps for the containers. If you are using an airlock (a device that lets CO2 escape without letting in outside air), you might use a cork with a bored center. Otherwise, a screw-top for your jug will work best. 

At homebrew stores, there’s a lot of other equipment you can get that can give you metrics on your mead- hydrometers, acid testers, flasks, and such. That stuff you might want to forego until you decide that homebrewing is something you are really into. Other stuff will make these steps a little easier, but aren’t strictly necessary for what we are doing here- siphons, filters, and such. 

    Here’s my set up for my next mead that I’m calling “Besamim,” after the aromatic spices used to end the Jewish observance of Shabbat.
    In case you’re wondering, that thing down at the lower left corner is my preferred airlock, with a cork for the container. My container is a 3 gallon PET carboy, since I’m making a larger batch here.

    Now, how do you get everything started?

    1. Pour the honey into your container.
    2. Pour the water in. You want to use cool to room temperature water here.
    3. Use a bit of hot water to swirl in the honey jar to make sure you get everything in there.
    4. Add your spices, cap the container, and shake vigourously to make sure the honey is dissolved.
    5. Wait.

    ​Yup. That’s really it.

    “What happens now?”
    Well, now your job is over for the time being. Inside that container, you’ve just diluted the honey enough that the live cultures trapped inside can get busy fermenting! Fermenting is when microorganisms (usually yeast) eating sugar, and excreting alcohol and CO2- and you just threw them into a Scrooge McDuck-style vault of their favorite food.
    All you have to do, for at least the next 10 days or so, is put your mead (well, technically, “must” at this point. It’s not mead yet) in a cool spot in your house, give it a little shake about twice a day, and let those little guys have fun. If you decided not to use a cork and airlock like I have here, you’ll need to vent it about twice a day to let the CO2 out but just SLIGHTLY untwisting or opening the top and resealing it quickly- remember, you REALLY don’t want outside air in there, with all the nasty stuff it carries.
    That’s all for the time being- stay tuned for Part 2 in a few days, for what to do when your mead is ready!

    Stay Classy,